Beer Pressed Italian Hoagie


IMG_7395 (1)

I saw the following  Food Network recipe for a Brick Pressed Sandwich with broccoli rabe and Italian meats and cheese.

http://www.foodnetwork.com/recipes/food-network-kitchens/italian-combo-and-broccoli-rabe-pressed-hero.html

The idea sounded interesting…the pressing to make it congeal together and something that would be good to serve a crowd.  However, I thought I might try this with the fresh kale I already had in the fridge from a local farm.  Obviously, this can be made with any type of lunchmeat or cheese.  I chose some of my favorites which are Boars Head hard salami, capicola and mozzarella.  This literally took me five minutes to put together.  It was a great, quick meal for a Friday and it was delicious.  Brent and Alec gave it two thumbs up!

Ingredients

1 loaf of Italian bread

1/2 lb. of hard salami

1/2 lb. of capicola

1/2 lb. or mozzarella

Four-five cups of kale chopped

1 clove of garlic finely minced

1 splash of lemon

Salt, Pepper and Red Pepper Flakes

Directions: Sauté kale in olive oil, salt, pepper, garlic and red pepper flakes until wilted, about three to five minutes. Squeeze a splash of fresh lemon on top and set aside.

Slice bread length-wise trying not to cut it completely in half.  Then scoop out some of the bread from one side.  This will help keep the sandwich together, make it easier to eat and reduce your carb intake.

Place the kale on the side where the bread was removed.  Then layer the meat and cheese to your liking.  I tend to prefer less meat than I get from a sub shop.

Fold the sandwich back together and wrap in aluminum foil.  The original recipe called for pressing the sandwich under a brick in the fridge for several hours.  As I had no spare bricks, I cut the sandwich in half and placed each half under a six pack of beer.  Also, while the recipe said to take the sandwich out after a few hours until it reaches room temperature before slicing and serving, I like my subs/hoagies hot so the cheese is nice and melted.  Before serving, I put the sandwich, wrapped in aluminum foil, in a 350 degree oven for about fifteen minutes.

This was so simple and easy and something I will definitely make again.  It would be good to try with homemade roasted red peppers, the original broccoli rabe, spinach, etc. as well as with different meats.


Clams Casino

Introduction

I used to eat clams casino frequently the third and final summer I lived in Ocean City, Maryland at BJ’s on First Street.  BJ’s back on the bay was magnificent.  It had an amazing view, great food, strong drinks and it was very convenient since I lived on First Street on Coastal Highway.  I think the day I realized it no longer existed..making Brent drive around the block just one more time..was one of the saddest days of my life.  From then on, I had to content myself with BJ’s on 75th street.  Though the view was also lovely, it was way more stuffy and the quality of food steadily decreased over the years.  I heard from the grapevine the owner, like many in the restaurant industry in OC,  had some issues with the bottle.  In any case, the clams casino went from one of the most succulent scrumptious things I ever tasted to what I am pretty sure are canned clams in used shells.  I finally had to terminate my relationship with BJ’s for good.  Luckily, I have perfected the recipe or at least “a recipe.”  They never would give it to me.  I have to say it is pretty darn awesome.  It can be a bit time consuming so I typically only make it for by Bestie when she comes to visit.  Here is a picture of the clams I made when she came to visit a few weeks ago.


Ingredients

3 dozen middle neck clams

1 stick of butter

1-2 cloves of garlic finely minced

1 tablespoon of Italian parsley finely chopped

1 lemon

4 slices of bacon cooked and chopped

5-6 slices of provolone (or mozzarella) cheese)

1 dash of tabasco

Salt and Pepper

Directions

Rinse thoroughly and then steam clams in large pot.  Once the clams open you can pull off and throw away the empty clam shells and place the shells with meat on a aluminum-lined cookie sheet.

In a small saucepan melt butter, add the garlic for 30-60 seconds and then add juice from one lemon, parsley,  salt, pepper and tabasco.  Stir and remove from heat.

Spoon the butter and herb mixture over each of the clams being careful not to spill over the sides.  Next, cut small triangular slices of cheese and place on top of clams. Finally, place some chopped bacon on top.

Broil clams until the cheese is bubbly and starts to brown.  Serve with additional lemon slices and hot sauce if desired.  Enjoy!  If you like clams this will be one of the best things you have ever eaten.  Just ask my Bestie.


Tacos al Pastor

I had the best, okay, only tacos al pastor of my life at the R & R Taqueria in Elkridge, Maryland, which was featured awhile back on Diners, Drive-Ins, and Dives.  For some reason I have never tried to replicate them until today probably because I was afraid they would not measure up.

I made them tonight because I have been trying to figure out what to do with this piece of boneless pork ribs that I have had in the freezer since…gasp…February…even though pork butt is the traditional cut of pork used for this dish.  I borrowed a recipe from some nice lady on Pinterest and made it my own.  The original recipe can be found at: https://www.pinterest.com/pin/472948398350398773/

Ingredients

1.5 lbs. of boneless pork ribs

1/2 large white onion diced

2 chipotles in adobo sauce

4 dried guajillo chiles reconstituted in hot water for 30 minutes or microwaved for two minutes

2 cloves of garlic roughly chopped

1/2 fresh pineapple roughly chopped

1 tsp. cumin

1 tbs. white vinegar

Salt and Pepper

Handful of cilantro

Juice from 1 lime

1 beer

Directions

Chop up pork into large cubes (about 2 inches wide).  Place in crock pot and pour beer on top.  I used a Miller Lite because it was left over from a party and I didn’t want to use Brent’s good beer nor did I have a chance to go out and get the recommended Negro Modelo.  Yes, I am justifying my use of Miller Lite…I was hesitant.

Blend all the remaining ingredients in the blender for 30-60 seconds.  Pour over meat and beer and mix.  Simmer for 4-5 hours in crock pot on high.

Remove meat from crock pot with slotted spoon and pull pork.  Place back in crock pot.  Serve with condiments.  I served mine with black beans, white rice and some pineapple salsa I made with the rest of the pineapple.

Results

I want to point out that I made several modifications to the original Pinterest recipe I was using.  I added garlic and cilantro and dried chiles (because I always have them on hand and they provide a ton of flavor).  She also used a much larger piece of meat; 5 lbs. to my measly 1.5.

IMG_7041 (1)My tacos were quite yummy though I definitely could have used more meat to balance out the meat to sauce ratio and I would use pork butt because it is a more flavorful cut of meat.  This is likely the only modification I would make because they were pretty darn good.  Also, I figured out that Miller Lite can actually be used for something though to be honest I would probably use a Negro Modelo next time.

Drunken Noodles


IMG_6086 (2).jpg

Introduction

I absolutely love this spicy Thai dish that I have enjoyed at Thai restaurants from Elkridge, MD to Honolulu and San Diego.   Drawing on various different recipes, I have been able to replicate it pretty well even though I don’t have access to all of the traditional ingredients like the Thai or holy basil that is used in generous proportions to top off the dish.  Still, it has always been one of Brent’s and mine (and formerly Grace’s) favorites and is in somewhat of a regular rotation.  Strangely (or not so) Alec now loves it whereas previously I think he had a hard time with the flavor of the fish sauce, which is proof again that our tastes buds are constantly changing and that you should keep making your kids try things they say they don’t like.  Also, unless you are terrified of any type of carbs this dish is both flavorful and very healthy.  Additionally, you can add whatever fresh vegetables you like.  I often include snow peas or broccoli.

IMG_6079 (1)
This guy has been helping a lot lately.
IMG_6068
Fresh Fruit, Veges and Herbs
IMG_6070.JPG
For the sauce

Ingredients

1 lb. of ground chicken or pork

1 package of Thai rice noodles

1 onion diced

4 cloves of minced garlic

1 tomato cored with all the seeds and mush scooped out and diced

2 jalapeños seeded and diced

1/2 cup of soy sauce

1/4 cup of fish sauce

1 tablespoon of sugar

1 tablespoon of chile garlic sauce (optional)

1 tablespoon of oyster sauce (optional)

Handful of chopped fresh basil to top off the dish

Lime slices for garnish (optional)

Directions

  1. Mix in a bowl the soy sauce, fish sauce, oyster sauce, chili sauce and sugar and set aside.
  2. Cook the Meat and Vegetables.  Two Options: Depending on the size of your fry pan and/or degree of laziness you can either cook the meat and vegetables/herbs together or individually and then add them together.  If choosing the former add the chicken and sautee until cooked and finely crumbled.  Then add the onions, peppers and tomatoes and cook until soft approximately 3-5 minutes.  Finally, add the garlic for 30-60 seconds.
  3. Add the sauce and cook through until warm
  4. Stir in the fresh basil and serve with fresh lime slices

Reflections and Feedback

This dish typically calls for fresh tomatoes though you can always substitute a can of diced being careful to drain the tomatoes properly.

I have cooked this dish with both pork and chicken, but think it is much more flavorful with the ground pork.

I have never been able to find the Thai basil the traditional recipes call for and a local Asian grocer told me it is very hard to come by.  In the meantime, the regular old basil seems to work just fine.

Traditional peppers are Thai chiles, but I can’t always get them so I will substitute with jalapeño or serrano chiles.  I use a bit of chile garlic sauce for extra heat and oyster sauce for extra flavor, but these are not typical ingredients so they can be omitted.

Typically, drunken noodle recipes call for rice noodles. I love the flat Thai rice noodles, but you can even use pasta like linguini or spaghetti.

Finally, the dish is called “Drunken Noodles” not because you are supposed to get drunk while you eat it or because it has alcohol in it but because it is supposed to be so spicy you need to drink a lot, and to this end, I failed.  While my boys thought is was delicious and it was, I definitely think it could have been spicier.  Next time!

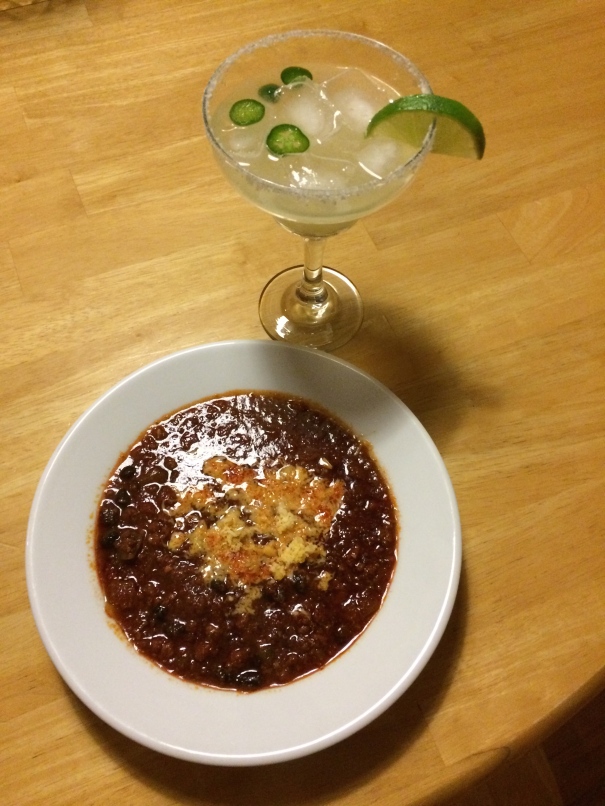
Blizzard Beef and Chorizo Chili and Jalapeño Margaritas

IMG_5995

Introduction:

Brent loves chili so I thought it would be a perfect dinner to make on the night of an historic blizzard.  He likes a more traditional chili aka the basics-tomatoes, onions, garlic, peppers, chili powder, and ground beef-while I prefer other cuts of beef with more complex flavors like cinnamon and even chocolate.  This recipe I came up with seemed to be a good compromise.  It is hard to explain “how I came up with it” but after years of making chili these are the ingredients I think work the best and that I prefer.  The past few times I decided to make my own chili powder with dried chiles.  I can’t say I make chili enough to know if it is better than the pre-packaged chili powder, but I thought I’d try and the results seemed positive.  Also, I think if using ground beef, adding a sausage like chorizo or any other makes for better flavor.

Ingredients for the Chili:

1 lb. organic ground beef (once you go organic, it’s hard to go back)

1/2 lb. Mexican chorizo (ground fresh sausage that is uncooked versus Spanish which is cured like pepperoni)

2 16oz. cans of whole plum tomatoes pureed in a blender

1 can of black beans rinsed

1 12 oz. bottle good quality pale ale beer

1 cup of chicken broth

4-6 dried chiles pulsed in blender until pulverized  (I used ancho and guajillo)

1 or 1 1/2 onions diced (depending on the size)

1/2 green pepper diced (what I had left in fridge)

3-4 cloves of garlic minced

2 tablespoons of tomato paste

1 tablespoon cumin

1/2 teaspoon oregano

1/4 teaspoon of cayenne

1 bay leaf

Plenty of salt and pepper

Directions:

You can make this on the stovetop and just simmer for an hour on medium to low heat.  I decided to make this in the crockpot today so I didn’t have to babysit the stove.  I really don’t have a preference or think one method is better, flavor wise.

To get started I put the crockpot on high and added the crushed tomatoes and broth to get it warmed up.  Next, I browned the ground beef and chorizo and put it in the crockpot.  Then, I sauteed the onions and peppers for about five minutes until softened and added the garlic for one minute before adding to the crockpot.  All of the other ingredients can then be put in the pot or crockpot.  I cooked the chili on high for three more hours, which gave it a good consistency-not too saucy or too chunky.

I served it with grated cheddar cheese, Tostitos chips and saltine crackers

Results:

The boys loved it.  Brent thought it was awesome and Alec clearly did too because he had three bowls.  They are looking forward to leftovers tomorrow.  I am including it in this blog because I will definitely be making it for them again.

I don’t mind grinding up the dried chiles because I already have them on-hand.  If not, I would just use chile powder.  I would also use some red bell pepper and fresh chiles instead of green bell pepper if I had them.

Finally, I must admit I really don’t love chili.  I know this was a great dinner for my guys and they enjoyed it, but I would rather have ordered a pizza!  On the other hand…

Jalapeño Margaritas

4 oz. of fresh lime juice

2 oz. good quality silver tequila

1 oz. Grand Marnier

1-2 tablespoons agave nectar

1/2 jalapeño sliced

Margarita Salt

Directions:

Cut a slice of lime and make a slit so you can wet glass farther down the side of the instead of just the tip of rim. Swirl rim and around the top side of glass in margarita salt.  Add ice and a few slices of jalapeño to the glass.  To shaker, add ice, tequila, lime juice, agave nectar and orange liqueur and pour.

Results:

Good margarita, though not as tasty and spicy as I first had in Point Pleasant Beach, New Jersey at 709 this past Labor Day.  Also, it seems you need to add a lot of agave nectar, which is expensive and limes, which are a pain in the butt to juice, so I would in the future use a mix along with some fresh lime.  Still enjoying them!


Petit Trois’s French Onion Soup

IMG_5608

I haven’t felt much excitement in cooking these days since my daughter became a vegetarian and ruined family dinners for me. However, the effort that went into this soup demands that it be documented.  Yesterday, I went to the market to buy either ingredients for a French Onion soup or a Thai Curry soup depending on what I found.  Since I found beef bones, I grabbed some Gruyere and headed home confident I had the rest of what I needed to make the soup.

When I got home I handed my husband the recipe and asked him to start reading it.  Accusingly, he was like “did you read this?”  and “did you know this broth takes two hours?”  Mr. Debbie Downer continues, “did you know you need at least a pound of onions?”  Okay, so the answer was no to all three questions.  I also realized I didn’t have tomato paste so I ran to the grocery store, again, but I was committed and didn’t seem to understand why he was being such a buzz kill.

Before I left I put the beef bones in the oven to roast for 45 minutes. Who knew homemade beef broth was so much fuss? Not me. Apparently,  you have to roast the bones first before putting them in water with the herbs and vegetables. While I was gone Brent started to chop the onions, celery, carrots and garlic for the broth, which needed to simmer for two hours with the roasted bones.

And then….we realized that after the broth was finished some almost three hours later it still needed two more hours to cook so I threw some frozen pizza in the oven.

Today, though, I was ready to finish the job.  I should say poor Brent was ready because he did most of the work on this one.  Besides the broth,  you need to cook the onions for an hour and then in the broth for another hour.  Finally, the soup is ladled into bowls and topped with toasted bread (Ciabatta in our case) and lots of shredded (very expensive) Gruyere (which is why provolone is a common substitute).

Obviously,  this was not a quick and easy soup to make, but I have to admit is was worth it.   This was the best damn French Onion soup we have ever had as well it had better been!   So if you really like French Onion soup, the following recipe is worth a try at least once in a lifetime.  Also, it is much easier if you make the broth a day or two ahead of time anyway.

*I pared down the original recipe and made a few adjustments.  The original can be found at http://www.bonappetit.com/recipe/petit-troiss-french-onion-soup.

IMG_5602

Ingredients

SERVINGS: 4

Beef Stock

  • 2 to 3 pounds beef bones
  • 1 tablespoon vegetable oil
  • large onion, chopped
  • celery stalks, chopped
  • carrots, peeled, chopped
  • 1/8 cup tomato paste
  • 1/2 head of garlic, halved crosswise
  • 2 sprigs thyme
  • 1 bay leaf

Soup And Assembly

  • 3 tablespoons vegetable oil
  • 1 tablespoon unsalted butter
  • 1/2 head of garlic, halved crosswise
  • 5 medium to large yellow onions, thinly sliced
  • Kosher salt, freshly ground pepper
  • 3 tablespoons dry white wine or Sherry
  • sprig thyme
  • 1 bay leaf
  • 4 slices ½-inch-thick baguette, toasted
  • 1 lb. grated Gruyere


Preparation

Beef Stock

  • Preheat oven to 425°. Place a wire rack inside a rimmed baking sheet and place bones on top. Roast bones (undisturbed) until deep golden brown, 40–50 minutes. Transfer to a large pot and add 2 qt. water. Bring to a simmer, then use a fine-mesh sieve to skim off any foam or gray bits from the surface. Remove from heat.
  • Meanwhile, in another large pot, heat oil over medium-high. Add onions, celery, and carrots and cook, stirring occasionally, until vegetables start to caramelize, 10–15 minutes. Add tomato paste and cook, stirring often, until slightly darkened in color, 6–8 minutes.
  • Add bones along with liquid, garlic, thyme, and bay leaf to vegetables. Bring just to a boil; reduce heat to low, and cook at a bare simmer, adding water as needed during cooking to maintain level of liquid until stock is flavorful, about 2 hours. Strain stock through a fine-mesh sieve into a large bowl or airtight container.  Instead of water, I actually added store-bought beef broth though in retrospect, I should have added more beef bones.  I only had about 2 lbs.

IMG_5597

Soup And Assembly

  • Heat oil and butter in a large pot over medium heat. Place garlic, cut side down, in pot and cook undisturbed until golden brown, about 4 minutes. Transfer garlic to a plate.
  • Add onions to same pot, season with salt and pepper, and cook, stirring occasionally at first and then more often as onions darken to keep them from getting too brown in any one spot, until golden but not mushy, 60–70 minutes (and no, this process can’t be rushed at a higher temperature).
  • Add wine or  Sherry and stir, scraping up any browned bits from bottom of pot. Stir in beef stock. Bundle up garlic, thyme, and bay leaf in cheesecloth and tie closed with kitchen twine. (or not I just scooped them out at the end) Add to pot; bring mixture to a boil. Reduce heat and cook, stirring occasionally, until liquid is reduced by one-quarter, flavors have melded, and onions are completely tender, 45–50 minutes.
  • Heat broiler. Divide soup among bowls and top each with a toast and a large mound of grated Gruyère cheese. Place on a rimmed baking sheet and broil until cheese is melted and brown in spots, about 5 minutes. Let cool for a minute or so before serving.


Pork Sugo with Pasta and Spring Mix with Fuji-Apple Vinaigrette

This is one of my favorite pasta sauces, which I have been making for the past few years and found in one of my Food and Wine magazines. I never thought of making a sauce with pork as the main ingredient (I usually make pork ribs in a mix of meatballs and sausage). At first glance, I was kind of freaked out by the recipe’s seemingly strange mix of fresh sage, mint and unsweetened cocoa power and the fact it did not include any tomatoes, but I was very impressed with the results and how it all came together.  It takes a bit of time so I made it on Sunday, but it is both inexpensive and a restaurant-quality meal.

In the fall, I love to make salad with apple-vinaigrette dressing using farm fresh apples.  When my son was in pre-school we were on a field trip to an apple farm and the son of the chef of my favorite local restaurant was in Alec’s class.  He gave us the recipe for the apple vinaigrette dressing at the popular Laurrapin Grill in Havre de Grace.

For my salad, I included spring mix, sliced fuji apple (the other half of the one used for the dressing), cucumber, red onion, some pecans and dried cranberries.   The salad with the dressing also pairs nicely with the richness of the pork sauce.

IMG_5178IMG_5180

Ingredients for the Pork Sugo aka Sauce

2 pounds of boneless pork roast or pork shoulder, sliced in four pieces

4 medium carrots, chopped

4 celery stalks, chopped

1 large yellow or Spanish onion, chopped

3-4 cloves of garlic, minced

2 tablespoons of unsweetened cocoa power

2 tablespoons of tomato paste

1 cup of dry white white

1 quart of chicken broth

1 tablespoon chopped parsley

1 tablespoon chopped sage

1 tablespoon chopped rosemary

2 tablespoons chopped mint

3 tablespoons of butter

Salt, Pepper, and Red Pepper Flakes

Directions:

Preheat oven to 350 degrees.   Liberally salt and pepper pork slices and brown in a dutch oven with a few tablespoons of olive oil.  After nicely browned on all sides add the vegetables-onion, celery, carrots, garlic-and the rosemary and sage. Sauté for several minutes and then stir the “unsweetened” cocoa power and cook for five more minutes.  Add the tomato paste and mix together.  Add the wine and simmer for five minutes.  Finally, add the broth and cook in the oven for 2-2 1/2 hours.

After the pork is fork tender, remove it from the pan and place it in a bowl and shred using two forks.  Puree the sauce with a hand blender or transfer it to a blender and then back to the pan.  This part is a real pain if you don’t have a hand-held blender and is why it is great investment.  Place the shredded pork back in the sauce.

IMG_5182IMG_5181

Stir in the butter, parsley, mint, red pepper flakes and salt and fresh ground pepper.

IMG_5190

Serve with your choice of pasta and plenty of Parmesan or Pecorino.  I love this Malfaldine from Wegmen’s

IMG_5188

*Two modifications I made this time are that I used dried sage only because they were out of fresh at my grocery store.  Also, I used a pork roast instead of the more fatty pork shoulder. Honestly, as long as you don’t use a pork loin and the roast is somewhat fatty it works fine.  However, if I did have a pork shoulder in my freezer I would have used that.  Still, it was….

Delicioso!


FullSizeRender (30)

Apple Vinaigrette Ingredients

1/2 fuji apple peeled and chopped

Apple Cider vinegar

Canola oil

Salt, pepper, sugar

Directions

Place chopped apples in blender.  Pour apple cider vinegar over apples until covered.  Add a teaspoon of sugar and blend.  Add 1/4 -1/2 cup canola oil.  Add more sugar and salt and pepper if desired.  The typical ratio of oil to vinegar is usually two:one but the chef did not offer exact measurements.  I prefer more vinegar to oil in this particularly dressing.  Enjoy!

IMG_5185.JPG

Parmesan Crusted Chicken Breasts with Sage Butter Sauce and Stuffing

IMG_5169

I found this recipe in a “Cuisine at Home” magazine. I am always looking for ways to make boneless chicken breast more flavorful and with a yummy breading and a sauce to top it off this recipe seemed like it would do the trick.  I served stuffing as my side.  Below, is the recipe as it is in the magazine with a few modifications.  The original recipe can be found here (http://www.tastebook.com/recipes/3701155-Parmesan-Crusted-Chicken-With-Sage-Butter-Sauce)

Ingredients for the Chicken

4 boneless skinless chicken breasts pounded thin

2 egg whites

2 teaspoons cornstarch (or flour)

1/2 lemon, juice of

1 cup coarse dry breadcrumbs

1 tablespoon chopped fresh Italian parsley

1 teaspoon salt

1teaspoon ground pepper

1cup parmesan cheese, grated

3 tablespoons olive oil

Ingredients for the Sauce

1 shallot, minced

1cup dry white wine (Chardonnay)

1cup heavy cream

1cup chicken broth

1/2 lemon, juice of

5 tablespoons cold butter

1 – 2 teaspoon dried sage

salt, white pepper, cayenne

Directions

1  Slice each breast in half lengthwise down the center. Place chicken in plastic bag or between two pieces of saran wrap and pound to an even thickness. *I have a bag of chicken breasts from Costco that are already thin so I actually skipped this step.

2  Blend egg whites, cornstarch, and lemon juice in wide shallow dish.

3  Combine bread crumbs, cheese, salt, and parsley in another wide shallow dish. Dip both sides of chicken into egg white mixture. Transfer chicken to dish containing crumb mixture. Pat crumbs on both sides of chicken.

4  Heat oil in non-stick pan and preheat oven to 450°. Sauté chicken over medium-high heat until chicken is brown and crisp, about 3 minutes on each side. Transfer skillet to oven to finish cooking, about 8 more minutes *or you can transfer chicken to a casserole dish.

Serve chicken with Sage Butter Sauce.

5  Sauté shallot in butter in small saucepan over medium heat until soft, about 2 to 3 minutes.

6  Add wine, cream, broth, and lemon juice. Simmer until liquid is reduced by half, about 8 to 10 minutes.

7  Whisk in butter stirring constantly.

8  Stir in sage and salt and white pepper and cayenne to taste. Keep sauce warm until ready to serve.

Stuffing

One package of Pepperidge Farm Country-Style Bread Cubes

1 stick of butter

1 onion, diced

2 stalks celery, diced

Chopped fresh parsley

2 cups of chicken broth

Sprinkle of dried thyme leaves and dried sage

Salt and pepper

Directions: The directions for stuffing can be found on the package of the bread cubes.  I added a bit more butter than the directions called for (a stick versus 4 tablespoons) as well as some fresh parsley, dried sage and thyme.  Simply sauté the onions and celery in the butter for a few minutes until vegetables are soft.  Add sage, thyme, parsley salt and pepper.  Add the 2 cups of broth and when it boils stir in the bag of bread cubes. Remove from burner and place the stuffing in a greased casserole dish and bake in a 350 degree oven for 30 minutes.

Results: Thankfully, this meal was fantastic since I have been in a rut lately.  I had to adjust the cooking time for the chicken since I was cooking it with the stuffing in a 350, not a 450 degree oven.  It only ended up needing about five more minutes (13-15 minutes total).  Searing the chicken for three minutes on both sides was perfect timing making the breasts nice and golden brown.  All in all, the chicken was delicious and tender and the sauce brought it up another notch as Brent likes to say.  The sauce was so good we were putting it on our stuffing as well and Alec-our little animal-actually drank the leftovers.  The stuffing also turned out great.  This is the first time I have ever used a package of bread cubes to make stuffing.  I think the bags of cubes are a great alternative to box and a lot easier than from scratch because you only do a little more work and it tastes just like homemade.  I will definitely be making this again!

Cabernet Braised Short Ribs with Roasted Carrots and Parmesan Mashed Potatoes

IMG_0753

To celebrate Brent’s turning 42 this week I had his brother and sister-in-law and new baby Kenna over for one of his favorites, short ribs.  I made a special trip to Wegman’s to get the short ribs because I will no longer buy beef from either of the local grocery stores for quality reasons.  I also made the mistake of going to Wegman’s hungry so while I only went there for short ribs that cost approximately $30, my bill ended up being $130.

Brent wanted me to make these Indian spiced short ribs I made a few years back but I wanted try this recipe I found in the advertisement section in last November’s Bon Apetit.  Poor Brent, I’m so controlling about the menu I won’t even let him choose on his birthday.

The ingredients for this meal were meant to feed six people including one non-beef eater.

Short Ribs

1 tablespoon salt, plus more for seasoning

1 tablespoon ground coriander

1/2 teaspoon ground ginger

1/2 teaspoon ground cumin

1/2 teaspoon of paprika (the original recipe calls for smoke paprika, but I was out)

1/2 teaspoon freshly ground pepper

1/4 teaspoon cayenne pepper

1/4 teaspoon ground cinnamon

2 tablespoons canola oil

4-5 pounds of bone-in short ribs (I think I may have had 4 or a bit shy of 4lbs.; the original calls for 5 1/2)

1 onion cut into large pieces

2 carrots, peeled and cut into pieces

2 celery stalks cut into pieces

2 cloves of garlic thinly sliced

1 teaspoon dry thyme leaves (or fresh per the original recipe)

1 1/2 cups of Cabernet Sauvignon (good quality)

2 cups of beef stock

IMG_4894

Directions

Preheat oven to 350 degrees.  In a small bowl mix the first seven ingredients together.  Rub spice mixture into both sides of the short ribs.  Heat a skillet with 2 tablespoons of canola oil.  Sear short ribs until dark brown on both sides, working in batches if necessary.  I had nine large short ribs and seared them three at a time. Then place the ribs on a platter or directly in dutch oven.

If the fry pan has burnt bits, remove them before adding onions, carrots, celery and garlic.  If the pan needs more oil add another tablespoon.  Sauté the vegetables for about five minutes until softened.  Add the thyme and tomato paste and stir. Finally, pour in the wine and broth until it comes to a boil.  Remove from heat.

Place the short ribs in a dutch oven and pour all ingredients from fry pan over top.  Bake for approximately three hours until ribs are very tender, but not falling apart.

Roasted Carrots

8 large carrots peeled with ends snipped

*Rub carrots with salt, pepper and a tiny bit of olive oil.  Bake for an hour and a half adding some of the juice from the short ribs halfway through.

Parmesan mashed potatoes

7-8 red potatoes peeled and cut into cubes (My rule is a potato per person like my grandma always said but then I always add a few extra)

1 stick of butter, softened

1/2-1 cup of whole milk, warmed

1/2 cup of fresh parmesan

Copious amounts of salt and pepper

Directions

Boil diced potatoes in a pot of salted water for about 15-20 minutes until potatoes are very fork tender.  Drain water and put the drained potatoes back on burner to remove any excess water for a few minutes.  Add salt and pepper and mix in the butter.  Add half of the milk and mix with an electric beater until smooth and creamy.  Add more milk and more salt and pepper if needed.  Mix in the parmesan and bake for 30-60 minutes.

FullSizeRender (29)

Results

Three hours was perfect time for the ribs though I was worried about having enough ribs for everyone. They were quite large, but I wanted to have two per person and I was one short.  I was trying to convince Alec to take just one for the team, but it ended up being a good amount.  I only needed one short rib, but I did stuff my face with one more when I found a leftover in the pot. I think Alec had three.  Everyone really seemed to enjoy the entire meal.  The carrots took an hour and a half because they were very large, and tasted fantastic braised in the wine/broth sauce from the meat.  The mash potatoes were awesome, creamy and delicious.  I think I like them better with whole milk instead of whipping cream, which I had been using.  Also, I think key is having the milk warm and the butter softened, and they are even better with some parmesan and baked in the oven for a bit.  The only thing was I could have done was to skim the fat off of the broth giving us a less greasy gravy, which no one used but me.  Overall, I thought it was a fantastic meal and worth the effort, and I think proof of that was the fact there was not one bite of leftovers.

Texas Chili

I was recently going through old Food and Wine magazines and found this Texas Chili recipe that appealed to me because of some of the particular ingredients including boneless short ribs, chocolate, beer and coffee.   Also, I don’t really care for the traditional, boring- ground beef, onion, beans, peppers, canned tomato, chili powder-type of chile that Brent loves.

This recipe, “Julia’s Texas-Style Chile with Beer” (from Food and Wine November 2010), is quite fussy so I don’t expect to inspire many, if any, to make this one.  I am including it here because I really liked it and plan on making it again.   Here is the link to the original recipe, because of course I made some changes. http://(http://www.foodandwine.com/recipes/julies-texas-style-chili-with-beer).  One of the main changes was to add a half a can of black beans because I like to have some-though not a lot-of beans in my chile and traditional Texas chile does not have beans or tomatoes.

Ingredients

3 dried pasilla-ancho chiles, stemmed and seeded

3 dried guajillo chiles, stemmed and seeded

2 canned chipotles in adobo (the rest can be refrigerated for about a month)

1 cup brewed coffee

1 12-oz. bottle of pale ale

2 lbs. of boneless short ribs, cut into small cubes

1 large white onion, chopped

3-4 cloves of garlic, minced

1/2 can of black beans, rinsed

3/4 teaspoon ground coriander

1/2 teaspoon ground cumin

1/4 teaspoon ground cinnamon

1/8 teaspoon ground cloves

5 cups of chicken stock

1 ounce of bittersweet chocolate, chopped

*Serve with cheddar cheese and chopped red onion

Directions

Soak the peppers in a bowl of very hot water for twenty minutes, and then strain.  Julia’s recipe uses fresh chiles but because I don’t have access to them, I use dry chiles.

Add the peppers, chipotles, coffee, and pale ale to a blender and puree until smooth.

After seasoning with salt and pepper, sauté short ribs in a tablespoon of oil until browned; approximately five minutes. Add the onion for about three minutes, then the garlic for 30 seconds.  Sprinkle the coriander, cumin, cinnamon and cloves over top.  If your skillet is not big enough, you may want to do the onion separate and then put the meat back in before the next step.

Finally, add the chile-ale mixture and simmer for about 2 hours. Mix in the chopped chocolate for the last five minutes.

*The original recipe adds masa harina or corn flour at the end, but I did not feel this was necessary because it was already sufficiently thick.

Results

IMG_4833

There are only two critics now since one is a vegetarian.  Alec and Brent “liked” it, but I thought it was fantastic.  For Brent, because he is just a bit simple, this just isn’t real chili, and I guess I understand.  I will make this again, but I will serve it like a taco on tortillas with condiments.  Also, the chili could have benefitted from an additional cup of broth.  I only added five when the recipe called for six because that was all I had.

*Another discrepancy between the original recipe was the type of peppers I used.  Aside from using fresh peppers, the original called for two of each: ancho, pasilla and guajillo.  While I had guajillo, and was able to find ancho, I could not find pasilla, I did find a bag of pasilla-ancho chiles so I just bought those.  I then used three dried pasilla-ancho and three guajillo.  I am still confused as to what is a “pasilla-ancho” and the Mexican owner of the Latin grocery store I go to couldn’t really clarify.  From what I thought pasilla and ancho are different peppers though commonly confused. It remains a mystery.  In any case, I am completely convinced that dried peppers that are reconstituted (soaked in hot water) work just as well, if not even better than fresh.